We see that many of WYSIWYG have implementation of image upload but when you actually want to implement that most them don't provide image upload upload right away. However with CK Editor I found a way to implement the image upload using ASP.net. However the coding is very simple so you can implement the same in PHP and other languages also.
First create a project (here I have named it ckeditorfortest). Select default options as given in the images below.


Now visit site http://ckeditor.com/download and download the standard version as shown in the picture.

After you have downloaded, upzip the package and include in the root of the project like this

Include the same in the Layout page.
Now to start with, in the index page remove all data and simply post the following lines of code
This is only put a Text Area in the page with id="editor1" and name="editor1". Please ensure that your textarea has id and name, without these attributes CK editor will not work.
Now after doing this put the following code in the Index.cshtml page
This will not enable the editor and when you run the program you will see page like this

You will see that the WYSIWYG is enabled for the textbox and is working. Now click on the image link and then you will see the following modal dialog come up.

As you can see we don't have option to upload images in this, but you can still provide image URL to include. Now to enable image browsing modify the script we wrote previously in the Index.cshtml to the following:
First create a project (here I have named it ckeditorfortest). Select default options as given in the images below.
Now visit site http://ckeditor.com/download and download the standard version as shown in the picture.
After you have downloaded, upzip the package and include in the root of the project like this
Include the same in the Layout page.
Now to start with, in the index page remove all data and simply post the following lines of code
<textarea id="editor1" name="editor1"><p>Initial value.</p></textarea>This is only put a Text Area in the page with id="editor1" and name="editor1". Please ensure that your textarea has id and name, without these attributes CK editor will not work.
Now after doing this put the following code in the Index.cshtml page
<script type="text/javascript">
    CKEDITOR.replace('editor1');
</script>
This will not enable the editor and when you run the program you will see page like this
You will see that the WYSIWYG is enabled for the textbox and is working. Now click on the image link
and then you will see the following modal dialog come up.As you can see we don't have option to upload images in this, but you can still provide image URL to include. Now to enable image browsing modify the script we wrote previously in the Index.cshtml to the following:
<script type="text/javascript">
    CKEDITOR.replace('editor1', {
        filebrowserImageBrowseUrl: '/home/uploadPartial',
        filebrowserImageUploadUrl: '/home/uploadnow'
    });
</script>
Now after implementing this code, reload the /home/Index page and click on the image icon in the editor toolbar again. What this code basically does is it gives CK editor what is the url where we are going to implement the Image browser and what is the url where we are going to implement the upload functionality.

Now you can see that we have one new tab call "Upload" and in "Image Info" tab also a new button has come up which says "Browse Server". In the "Upload" tab you will see option to choose file and send it to server. If you click the same now it will not work nor will the "Browse Server" button in "Image Info" tab.

Now let's build the functionality for these tabs.
First let's create a viewmodel for holding the imageurl(the image url contains the image name also). So right click on the model folder and create class file and name the class file imagesviewmodel.cs. Paste the following code in the viewmodel.
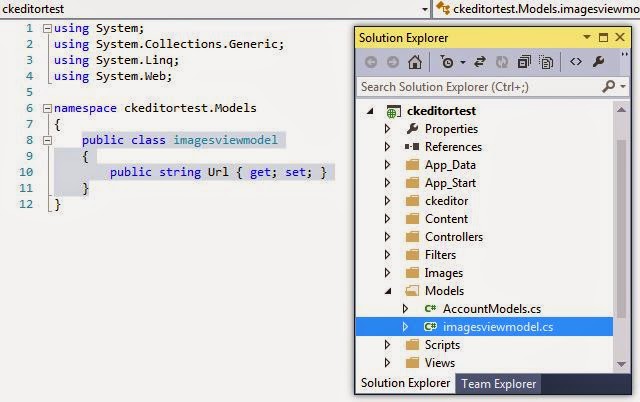
public class imagesviewmodel
{
    public string Url { get; set; }
}
Next, open the home controller and paste the following code:
using System;
using System.Collections.Generic;
using System.Linq;
using System.Web;
using System.Web.Mvc;
using ckeditortest.Models;
using System.IO;

namespace ckeditortest.Controllers
{
    public class HomeController : Controller
    {
        public ActionResult Index()
        {
            return View();
        }
        public void uploadnow(HttpPostedFileWrapper upload)
        {
            if(upload!=null)
            {
                string ImageName = upload.FileName;
                string path = System.IO.Path.Combine(Server.MapPath("~/Images/uploads"), ImageName);
                upload.SaveAs(path);
            }
        }
    }
}
In this new action method which if you realize is same as given in previous jquery script we wrote in Index.cshtml "filebrowserImageUploadUrl: '/home/uploadnow'", we need to ensure that the name of the action method remains the same. This action will take in a HttpPostedFileWrapper input which we have named upload. The filewrapper will have following information

but we here will be using FileName only. So we will first check if the upload HttpPostedFileWrapper is properly loaded, once that is ascertained we will generate the string path by combining the path where image will be uploaded in the server with the filename. upload.SaveAs(path) will save the image to the local provided. Also ensure that the action returns void because we don't need to do any action after upload and the page should remain as it is. Now if you try to run the program and go to "Upload" tab and click choose file you can choose file and click on "send it to server" and same will be uploaded to the server.
Now the upload is complete. Now we will look at how we will insert this image into the WYSIWYG editor.
For that we will create another action in the home controller as given in the jquery in the Index.cshtml "filebrowserImageBrowseUrl: '/home/uploadPartial',"the following code lists the action method.
public ActionResult uploadPartial()
{
     var appData = Server.MapPath("~/Images/uploads");
     var images = Directory.GetFiles(appData).Select(x => new imagesviewmodel
     {
        Url = Url.Content("/images/uploads/" + Path.GetFileName(x))
     });
     return View(images);
}
this action method will basically list out all images that are there in the upload directory for the user to choose which image he wants to insert into the WYSIWYG. So the variable "images" take all images that are there in the upload directory along with filename and path. The action method sends this variable to the view.
Next right click on the action method and create view and name the view uploadPartial.cshtml.
Paste the following code in the view.
@model IEnumerable<ckeditortest.Models.imagesviewmodel>

@foreach (var image in Model)
{
    <a href="#" class="returnImage" data-url="@Request.Url.GetLeftPart(UriPartial.Authority)@image.Url">
        <img src="@image.Url" alt="Hejsan" id="#image" data-source="@image.Url" width="200" height="200"/>
    </a>
}
<script type="text/javascript">
    $(document).ready(function () {
        $(".returnImage").click("click", function (e) {
            var urlImage = $(this).attr("data-url");
            window.opener.updateValue("cke_72_textInput", urlImage);
            window.close();
        });
    });
</script>
So upon completing this if you click on the "Browse Server" button, a new page will open which will show all the images in the upload folder. As shown below:

To understand what is done in the view, we make this view strongly typed to the viewmodel we create earlier. Now we run through each of the image and append the same to an html anchor. As your will notice we will put in the full path of the image file in data-source attribute. Here @Request.Url.GetLeftPart(UriPartial.Authority) will give the left part of the url of your website. That is if your website url is http://localhost:5938 then this will be returned even if you are http://localhost:5938/home/uploadpartial location. To this we will append the image url which is basically location of the image from the root folder along with image name. So this makes the image clickable. Below we will write some jquery to take the image URL which needs to be returned to "Image Info" tab in the modal dialog where we clicked "Browse server". What this jquery code does is basically take the image url and send it the opener page which opened this page. So it will be sent one step back and then we close the window.
As of now if you click on the image nothing will happen. For the image url to come in the "Image Info" tab URL textbox follow the steps below.
Now one final step in the Index.cshtml add one function to get the value of image url from uploadpartial and put that value in the URL textbox in "Image Info" tab. I will give you the full script section so that we don't get confused.
<script type="text/javascript">
    CKEDITOR.replace('editor1', {
        filebrowserImageBrowseUrl: '/home/uploadPartial',
        filebrowserImageUploadUrl: '/home/uploadnow'
    });

    function updateValue(id, value) {
        // this gets called from the popup window and updates the field with a new value
        document.getElementById(id).value = value;
    }
</script>
The function updateValue basically takes the id of the element in this case the URL textbox which we send from uploadpartial and the value and inputs the value to the textbox.
Now recompile the code and run now if you go to "Image Info" tab, and click "Browse Server" button you will be shown the uploadpartial, which will basically show all images (clickable) from the upload folder. When you click on any of the image the uploadpartial will be closed and the url of the clicked image will be populated in "URL" textbox of the "Image Info" tab. If you click "Ok" now you will see that the image is inserted in the WYSIWYG editor like in the image below:


Full Code:
HomeController.cs
using System;
using System.Collections.Generic;
using System.Linq;
using System.Web;
using System.Web.Mvc;
using ckeditortest.Models;
using System.IO;

namespace ckeditortest.Controllers
{
    public class HomeController : Controller
    {
        public ActionResult Index()
        {
            ViewBag.Message = "Modify this template to jump-start your ASP.NET MVC application.";

            return View();
        }
        public ActionResult uploadPartial()
        {
            var appData = Server.MapPath("~/Images/uploads");
            var images = Directory.GetFiles(appData).Select(x => new imagesviewmodel
            {
                Url = Url.Content("/images/uploads/" + Path.GetFileName(x))
            });
            return View(images);
        }
        public void uploadnow(HttpPostedFileWrapper upload)
        {
            if(upload!=null)
            {
                string ImageName = upload.FileName;
                string path = System.IO.Path.Combine(Server.MapPath("~/Images/uploads"), ImageName);
                upload.SaveAs(path);
            }

        }
    }
}
imagesviewmodel.cs
using System;
using System.Collections.Generic;
using System.Linq;
using System.Web;

namespace ckeditortest.Models
{
    public class imagesviewmodel
    {
        public string Url { get; set; }
    }
}
Index.cshtml
@{
ViewBag.Title = "Home Page";
}
<textarea id="editor1" name="editor1"><p>Initial value.</p></textarea>
<script type="text/javascript">
CKEDITOR.replace('editor1', {
filebrowserImageBrowseUrl: '/home/uploadPartial',
filebrowserImageUploadUrl: '/home/uploadnow'
});
function updateValue(id, value) {
// this gets called from the popup window and updates the field with a new value
document.getElementById(id).value = value;
}
</script>
uploadPartial.cshtml
@model IEnumerable<ckeditortest.Models.imagesviewmodel>

@foreach (var image in Model)
{
    <a href="#" class="returnImage" data-url="@Request.Url.GetLeftPart(UriPartial.Authority)@image.Url">
        <img src="@image.Url" alt="Hejsan" id="#image" data-source="@image.Url" width="200" height="200"/>
    </a>
}
<script type="text/javascript">
    $(document).ready(function () {
        $(".returnImage").click("click", function (e) {
            var urlImage = $(this).attr("data-url");
            //This takes the data value and id of the editor and sends the data(i.e.,image url) back to the caller page
            window.opener.updateValue("cke_72_textInput", urlImage);
            window.close();
        });
    });
</script>
_Layout.cshtml
<!DOCTYPE html>
<html lang="en">
<head>
<meta charset="utf-8" />
<title>@ViewBag.Title - My ASP.NET MVC Application</title>
<link href="~/favicon.ico" rel="shortcut icon" type="image/x-icon" />
<meta name="viewport" content="width=device-width" />
<script type="text/javascript" src="http://localhost:50972/ckeditor/ckeditor.js"></script>
<script src="~/Scripts/jquery-1.8.2.js"></script>
@Styles.Render("~/Content/css")
@Scripts.Render("~/bundles/modernizr")
</head>
<body>
<header>
<div class="content-wrapper">
<div class="float-left">
<p class="site-title">@Html.ActionLink("your logo here", "Index", "Home")</p>
</div>
<div class="float-right">
<section id="login">
@Html.Partial("_LoginPartial")
</section>
<nav>
<ul id="menu">
<li>@Html.ActionLink("Home", "Index", "Home")</li>
<li>@Html.ActionLink("About", "About", "Home")</li>
<li>@Html.ActionLink("Contact", "Contact", "Home")</li>
</ul>
</nav>
</div>
</div>
</header>
<div id="body">
@RenderSection("featured", required: false)
<section class="content-wrapper main-content clear-fix">
@RenderBody()
</section>
</div>
<footer>
<div class="content-wrapper">
<div class="float-left">
<p>© @DateTime.Now.Year - My ASP.NET MVC Application</p>
</div>
</div>
</footer>
@Scripts.Render("~/bundles/jquery")
@RenderSection("scripts", required: false)
</body>
</html>